Malware analysis is a critical yet intricate task in cybersecurity, often requiring analysts to reverse-engineer complex binaries to uncover malicious behavior. With the rise of artificial intelligence (AI), tools like Grok, ChatGPT and Gemini and others have begun to transform this process, offering powerful assistance to malware analysts. In this post, I’ll explore how AI can enhance malware analysis, share my personal workflow for integrating AI into function analysis, and provide a detailed look at a custom Binary Ninja plugin I’ve developed to streamline the process.
Overview of AI Assistance in Helping Malware Analysts
AI has become a game changer in malware analysis by automating repetitive tasks, providing contextual insights, and accelerating the understanding of obfuscated code. Traditional reverse-engineering tools like IDA Pro, Ghidra, and Binary Ninja excel at disassembling binaries, but they often leave analysts with the heavy lifting of interpreting cryptic function names, variable purposes, and code logic. AI steps in to bridge this gap by:
- Pattern Recognition: Identifying common malware behaviors or techniques (e.g., encryption, API calls) across disassembled code.
- Code Summarization: Offering human-readable explanations of complex functions.
- Naming Suggestions: Proposing meaningful names for functions and variables based on their behavior or context.
- Inline Commentary: Generating comments to clarify code intent, saving analysts time during documentation.
By integrating AI into the workflow, analysts can focus on high-level strategy and decision-making rather than getting bogged down in minutiae. In my experience, tools like Grok or Gemini can analyze disassembled code (e.g., High-Level Intermediate Language, or HLIL) and provide actionable insights with minimal prompting.

My Workflow for Function Analysis Integrated with AI
Here’s how I incorporate AI into my function analysis process using Binary Ninja, a powerful reverse-engineering platform:
Step 1: Extract Function Code and Sub Function Call
I start by identifying a function of interest in a binary, then extract its HLIL representation along with its sub-function calls. This involves iterating through the function’s code and recursively tracing all called functions to build a comprehensive call graph.
Step 2: Function Name Recommendations
Many malware samples use generic or obfuscated function names (e.g., sub_401000). I feed the HLIL code into an AI tool and ask it to suggest meaningful names based on the function’s behavior. For example, a function making network-related API calls might be renamed send_network_packet.

{
  "0x43e87f": {"original_name": "sub_43e87f", "new_name": "mw_function_convert_number_to_string"},
  "0x4423f0": {"original_name": "sub_4423f0", "new_name": "mw_function_float_to_int"},
  "0x421190": {"original_name": "sub_421190", "new_name": "mw_function_fast_memcpy"},
  "0x42ce10": {"original_name": "sub_42ce10", "new_name": "mw_function_buffer_division"},
  "0x44147f": {"original_name": "sub_44147f", "new_name": "mw_function_check_fp_env"}
}
Step 3: Variable Name Recommendations
Similarly, I use AI to analyze variable usage within the function and propose descriptive names. A variable storing a buffer might be renamed from var_8 to data_buffer, improving readability.

{
  "0x43e87f": {
    "variables": [
      {"original_name": "var_978", "new_name": "mw_fp_class_string"},
      {"original_name": "var_76c_1", "new_name": "mw_fp_value"},
      {"original_name": "var_770_1", "new_name": "mw_converted_int"},
      {"original_name": "var_574", "new_name": "mw_digit_buffer"},
      {"original_name": "var_3a4", "new_name": "mw_output_buffer"},
      {"original_name": "var_758_4", "new_name": "mw_div_quotient"},
      {"original_name": "var_774_3", "new_name": "mw_alt_div_quotient"},
      {"original_name": "s_1", "new_name": "mw_string_result"}
    ]
  },
  "0x42ce10": {
    "variables": [
      {"original_name": "var_2c_1", "new_name": "mw_divisor"},
      {"original_name": "var_14_1", "new_name": "mw_buffer_ptr"}
    ]
  }
}
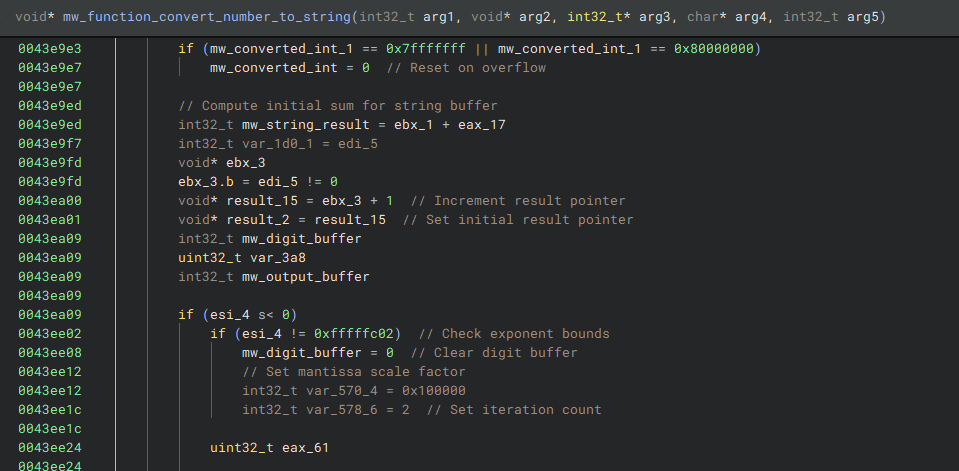
Step 4: Inline Comments
Finally, I request AI-generated inline comments for each function and variable. These comments explain the purpose of code blocks or the role of specific variables, making the analysis more accessible to team members or future reviews.

{
  "0x43e87f": {
    "comments": [
      {"address": "0x43e8c5", "comment": "Check if arg1 is non-negative"},
      {"address": "0x43e8c7", "comment": "Set space character if condition true"},
      {"address": "0x43e8ce", "comment": "Store space in output buffer arg3[0]"},
      {"address": "0x43e8d8", "comment": "Store arg4 in output buffer arg3[2]"},
      {"address": "0x43e908", "comment": "Classify floating-point value in arg4"},
      {"address": "0x43e910", "comment": "Check if arg4 is a special float (not normal)"},
      {"address": "0x43e918", "comment": "Set flag in output buffer arg3[1] for special case"},
      {"address": "0x43e922", "comment": "Check for Infinity"},
      {"address": "0x43fbd2", "comment": "Store Infinity string"}
    ]
  }
}
This workflow reduces manual effort and enhances collaboration by producing well-documented, human-readable output, all powered by AI
Plugin Development on Binary Ninja
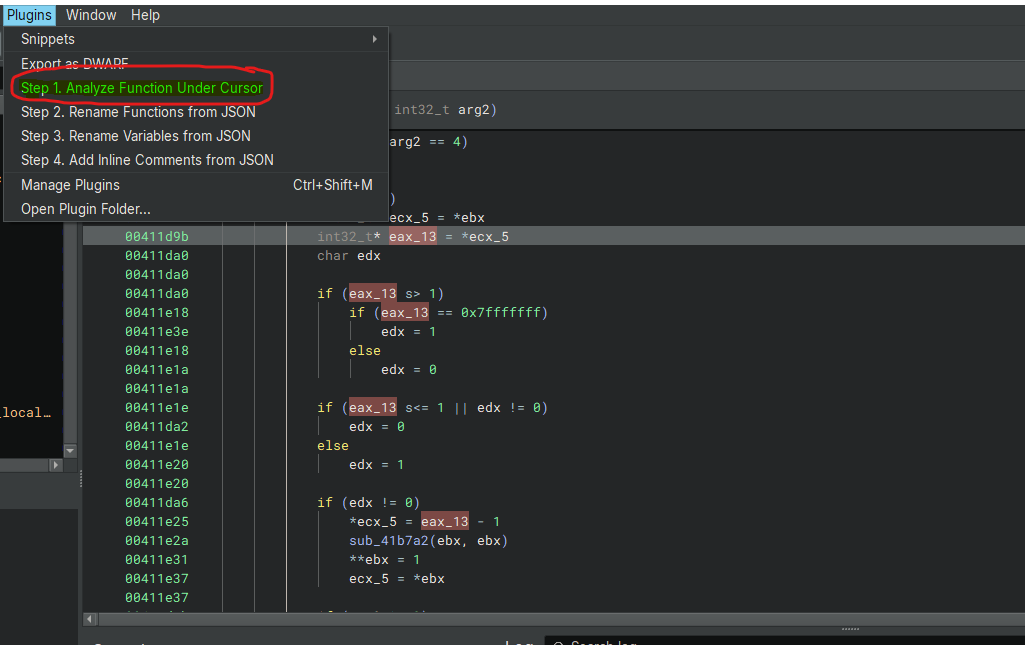
To operationalize this workflow, I’ve developed a custom Binary Ninja plugin that automates the extraction of HLIL code and its sub-function calls. The plugin, written in Python, integrates seamlessly into Binary Ninja’s UI and provides a clickable command to analyze functions under the cursor. The output is displayed in a dialog box, ready to be copied and analyzed by an AI tool.
Diving into the Plugin Code: Listing Function Code and Sub-Functions
Let’s break down the core functionality of the plugin, which recursively lists a function’s HLIL code and its sub-function calls. Below is the key code with explanations:
from binaryninja import PluginCommand, HighLevelILOperation, BinaryView
from binaryninjaui import UIContext
from PySide6.QtWidgets import (QDialog, QVBoxLayout, QTextEdit, QPushButton, QApplication)
from PySide6.QtCore import Qt
import io

class OutputDialog(QDialog):
    def __init__(self, text, parent=None):
        super().__init__(parent)
        self.setWindowTitle("Function Analysis Output")
        self.setMinimumSize(600, 400)
        layout = QVBoxLayout()
        self.text_edit = QTextEdit()
        self.text_edit.setReadOnly(True)
        self.text_edit.setText(text)
        layout.addWidget(self.text_edit)
        self.copy_button = QPushButton("Copy to Clipboard")
        self.copy_button.clicked.connect(self.copy_to_clipboard)
        layout.addWidget(self.copy_button)
        self.setLayout(layout)

    def copy_to_clipboard(self):
        clipboard = QApplication.clipboard()
        clipboard.setText(self.text_edit.toPlainText())

def analyze_hlil_operand(bv: BinaryView, operand, indent_level: int, recurse: bool, visited: set, output: io.StringIO):
    """Recursively analyze HLIL operands for function calls."""
    called_func = None
    if hasattr(operand, 'operation') and operand.operation == HighLevelILOperation.HLIL_CALL:
        call_dest = operand.dest
        if call_dest.operation == HighLevelILOperation.HLIL_CONST_PTR:
            called_func = bv.get_function_at(call_dest.constant)
            tag = " //visited" if called_func and called_func.name in visited else ""
            output.write(f"{'  ' * indent_level}0x{operand.address:x}: {operand}{tag}\n")

    if called_func and called_func.name not in visited and called_func.name.startswith(('sub_', 'mw_function_')):
        print_function_hlil(bv, called_func.name, indent_level + 1, recurse, visited, output)

def print_function_hlil(bv: BinaryView, func_name: str, indent_level: int = 0, recurse: bool = True,
                       visited: set = None, output: io.StringIO = None):
    """Print HLIL instructions for a function and its sub-functions recursively."""
    if visited is None:
        visited = set()
    if func_name in visited or not bv.get_functions_by_name(func_name):
        return
    visited.add(func_name)

    function = bv.get_functions_by_name(func_name)[0]
    if not function.hlil:
        return

    params = ", ".join(str(param) for param in function.parameter_vars) if function.parameter_vars else "void"
    output.write(f"{'  ' * indent_level}0x{function.start:x}: {function.name}({params})\n")

    for instr in function.hlil.instructions:
        addr = instr.address
        instr_str = str(instr)
        tag = " //visited" if instr.operation == HighLevelILOperation.HLIL_CALL and bv.get_function_at(instr.dest.constant).name in visited else ""
        output.write(f"{'  ' * indent_level}0x{addr:x}: {instr_str}{tag}\n")
        if recurse and instr.operation == HighLevelILOperation.HLIL_CALL:
            analyze_hlil_operand(bv, instr, indent_level, recurse, visited, output)

def analyze_function_under_cursor(bv: BinaryView, addr: int):
    """Analyze the function under the cursor and display output."""
    functions = bv.get_functions_containing(addr)
    if not functions:
        print("No function found.")
        return
    output = io.StringIO()
    print_function_hlil(bv, functions[0].name, output=output)
    dialog = OutputDialog(output.getvalue())
    dialog.exec_()

PluginCommand.register_for_address(
    "Step 1. Analyze Function Under Cursor",
    "Prints HLIL of the function under the cursor and its called functions recursively",
    analyze_function_under_cursor
)
Key Components:
- OutputDialog: A PySide6-based UI dialog that displays the HLIL output and includes a “Copy to Clipboard” button for easy transfer to an AI tool.
- analyze_hlil_operand: Recursively traverses HLIL operands to identify and list function calls, tagging revisited functions with //visited.
- print_function_hlil: The core function that iterates through a function’s HLIL instructions, handles recursion, and formats the output with indentation.
- analyze_function_under_cursor: The entry point for the plugin, triggered by the user clicking a function in Binary Ninja.
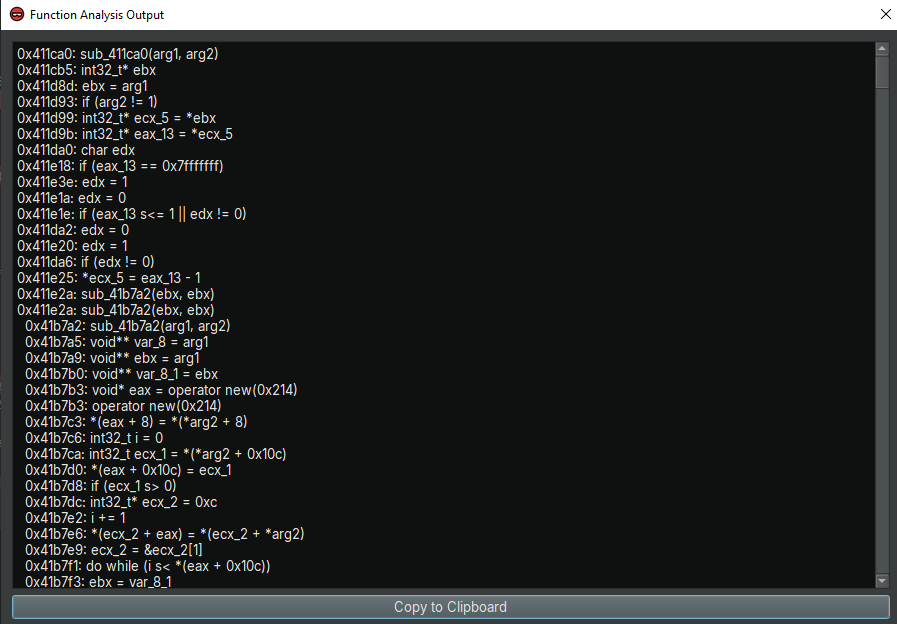
This plugin ensures that analysts can quickly extract structured HLIL code, including sub-function calls, with minimal effort.
Analyzing HLIL Code with AI
Once the plugin generates the HLIL output, you can copy it from the dialog and paste it into an AI tool like Grok or Gemini. For a basic analysis, use a simple prompt such as: Analyze this HLIL code from the perspective of a malware analyst.
This prompt instructs the AI to examine the code for potential malicious behavior, such as suspicious API calls, data manipulation, or obfuscation techniques. In my next post, I’ll dive deeper into crafting more specific prompts to extract detailed insights from the AI.
Interpreting AI Analysis Results
After submitting the HLIL code, the AI returns a detailed breakdown. For example, it might identify a function as a decryption routine, suggest renaming it to decrypt_payload, and provide comments like // XORs buffer with key at 0x401020. These insights allow me to refine my analysis, update the binary with better names and comments, and focus on the most critical parts of the malware.
Conclusion
AI assistance in malware analysis is not just a futuristic concept, it’s a practical reality that enhances efficiency and accuracy. By integrating tools like Binary Ninja with AI-driven analysis, I’ve streamlined my workflow and gained deeper insights into malicious code. The custom plugin I’ve shared here is just the beginning stay tuned for my next post, where I’ll explore advanced prompting techniques to maximize AI’s potential in this field.
